Screeding for Underfloor Heating in Nottingham

Creating the Perfect Foundation for Your Heating System
The screed you choose for your underfloor heating installation directly impacts your system's efficiency, running costs, and long-term reliability. Poorly selected or incorrectly installed screed creates air gaps around heating pipes, drastically reducing heat transfer whilst increasing energy consumption. The right screed installation encapsulates your heating system completely, maximising thermal conductivity and ensuring your rooms heat evenly without cold spots.
At Flooring Nottingham, we specialise in floor screeding for underfloor heating systems across Nottingham, West Bridgford, Beeston, and throughout Nottinghamshire. Our expertise combines both the screeding and subsequent floor installation, ensuring your entire floor build-up – from heating system through to finished floor surface – works together as an integrated, efficient system.
Why Underfloor Heating Requires Specialist Screeding
Standard floor screeding techniques don't automatically translate to successful underfloor heating installations. Heating pipes create an uneven surface with raised ridges and gaps that conventional screeding methods struggle to address properly. Any air voids left around pipes act as insulators, preventing efficient heat transfer from the pipework to your floor surface above. This forces your heating system to work harder and longer to achieve comfortable room temperatures, wasting energy and money.
Specialist underfloor heating screed must flow completely around every pipe, eliminating air pockets whilst providing sufficient coverage depth above the pipes for structural integrity. The screed also needs appropriate thermal conductivity properties to transfer heat efficiently upwards rather than allowing it to dissipate into the substrate below. These requirements mean that screed selection and application technique become critical factors in how well your underfloor heating system performs.


Liquid Screed - The Ideal Solution for Underfloor Heating
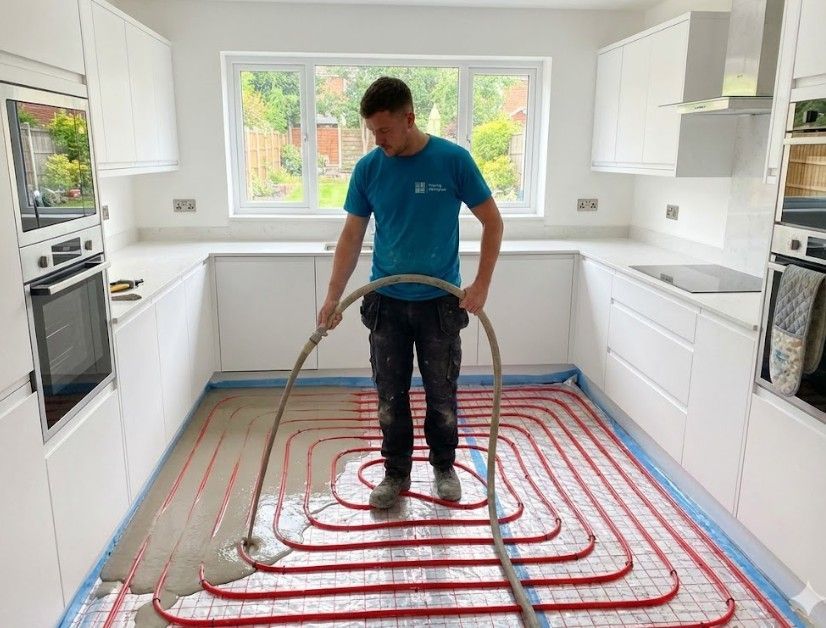
Liquid self-levelling screed has become the industry standard for underfloor heating installations, and for excellent reasons. Its flowing consistency allows it to completely encapsulate heating pipes without manual intervention, eliminating the air voids that plague traditional screeding methods. When we pump liquid screed over your heating system, it flows around and between pipes naturally, filling every gap and creating the continuous contact essential for efficient heat transfer.
The self-levelling properties deliver another significant advantage: consistent screed depth across the entire floor area. With traditional screeding methods, maintaining uniform coverage over an uneven surface of pipes requires considerable skill and time. Even then, variations inevitably occur. Liquid screed automatically seeks its own level, ensuring the depth above your heating pipes remains constant throughout the room. This consistency means your floor heats evenly without the hot spots and cool patches that occur when screed depth varies significantly.
Liquid screed's superior thermal conductivity compared to traditional sand-cement mixes further enhances system efficiency. Heat transfers through the screed more readily, meaning your rooms reach comfortable temperatures faster whilst using less energy. Many of our Nottingham clients report noticeably reduced heating costs after switching from radiator-based systems to underfloor heating with properly screeded floors – though we're always realistic that actual savings depend on your specific property, insulation levels, and heating habits.
Traditional Screed Over Underfloor Heating
Whilst liquid screed dominates modern underfloor heating installations, traditional sand-cement screed remains viable for certain projects. Skilled application can achieve adequate coverage around heating pipes, though it requires considerably more labour and time compared to pumped liquid screed. The semi-dry mix must be carefully worked around pipes and consolidated to minimise air gaps.
Traditional screed typically requires greater depth over heating pipes – usually 65-75mm minimum compared to 50-65mm for liquid screed. This additional depth impacts your finished floor height, which can create problems in properties with limited ceiling height or where floors must align with existing levels. The thicker screed also increases thermal mass, meaning floors take longer to heat up, though they also retain heat longer once warmed – a characteristic some clients prefer for maintaining steady temperatures.
For smaller underfloor heating installations – perhaps a single bathroom or utility room – traditional screed may prove more practical and cost-effective than mobilising pumping equipment for a small area. However, for whole-house systems or larger open-plan spaces, liquid screed's advantages in speed, consistency, and thermal performance generally outweigh any cost savings from traditional methods.
Screed Depth and Floor Build-Up Considerations
The floor build-up over your underfloor heating system requires careful planning to balance structural requirements, thermal performance, and the practical constraints of your property. The total floor height affects doorway clearances, transitions to adjacent rooms, and whether your new floor aligns properly with existing levels throughout your Nottingham home.
Minimum Screed Coverage Over Pipes
Heating pipes must have adequate screed coverage above them to prevent cracking and ensure structural integrity. For liquid screed installations, we typically work with 50-65mm total depth, which provides approximately 30-35mm of coverage above standard 16mm diameter pipes. This coverage protects the pipes from damage whilst allowing efficient heat transfer to the floor surface above.
Traditional sand-cement screed requires greater depth due to its different structural characteristics – usually 65-75mm total depth minimum. These measurements might seem modest, but when combined with insulation boards beneath the heating system (typically 20-50mm) and your chosen floor finish on top (10-20mm), the complete floor build-up can easily reach 90-150mm. In properties with limited floor height, this becomes a significant consideration.
Insulation Requirements Beneath the System
Insulation boards installed beneath your heating pipes serve a crucial purpose: directing heat upwards into your living space rather than downwards into the substrate below. Without adequate insulation, a substantial portion of your heating energy simply warms the concrete slab or ground beneath your home – an expensive waste that insulation boards prevent.
The required insulation thickness depends on whether you're installing underfloor heating on a ground floor or upper floor, and what sits beneath. Ground floor installations over uninsulated concrete typically need 50-100mm of high-density insulation board. Upper floor installations over heated rooms below can use thinner insulation – sometimes as little as 20-30mm – since heat loss downwards matters less when warming another room in your home.
Modern insulation boards designed for underfloor heating combine thermal resistance with high compressive strength, providing a stable platform for the heating pipes and screed above. These boards must remain absolutely stable and flat; any movement or unevenness telegraphs through the screed and can cause problems with your finished flooring.
Compatible Floor Finishes
One of underfloor heating's great advantages is its compatibility with almost any floor finish. Porcelain and ceramic floor tiles offer excellent thermal conductivity, making them ideal over underfloor heating – the hard surface transfers heat efficiently whilst the thermal mass helps maintain consistent temperatures. Luxury vinyl tiles and engineered wood flooring also perform well, provided you select products specifically rated for use with underfloor heating systems.
Laminate flooring works successfully over underfloor heating, though you must choose laminates with appropriate thermal resistance ratings – too much resistance inhibits heat transfer. Solid wood flooring requires more careful consideration as movement from temperature changes can cause issues with certain species and board widths. We guide you through these considerations during our consultation, ensuring your chosen floor finish complements your heating system rather than compromising its performance.
The Floor Screeding Process
Successful floor screeding begins well before any screed material touches your floor. Our systematic approach ensures every screeded floor we install in Nottingham meets the exacting standards required for long-term performance.
Pre-Screeding Preparation
The substrate preparation phase determines whether your screed will bond properly and perform reliably for decades. We start by thoroughly assessing your existing floor structure. Concrete floors must be cleaned of dust, loose material, and any contaminants that would prevent proper adhesion. We typically apply a PVA bonding agent or specialist primer to seal porous concrete and create the ideal surface for screed adhesion.
Where we're screeding over insulation boards – common with underfloor heating systems – we verify that boards are laid flat, stable underfoot, and won't flex when walked upon. Any movement in the substrate will telegraph through to the screed above. For larger screeding areas, we lay a polythene damp-proof membrane to prevent moisture migration from the substrate affecting the screed curing process.
Application and Levelling
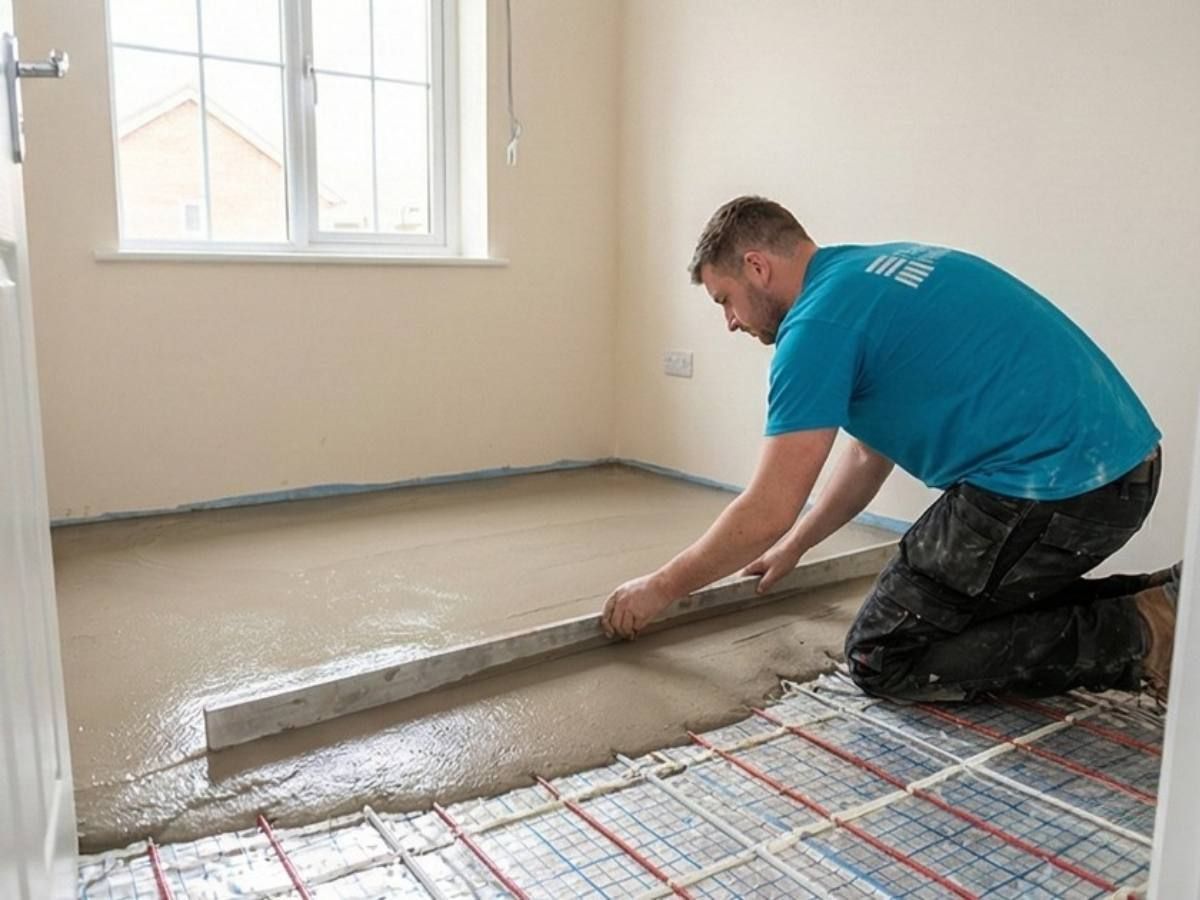
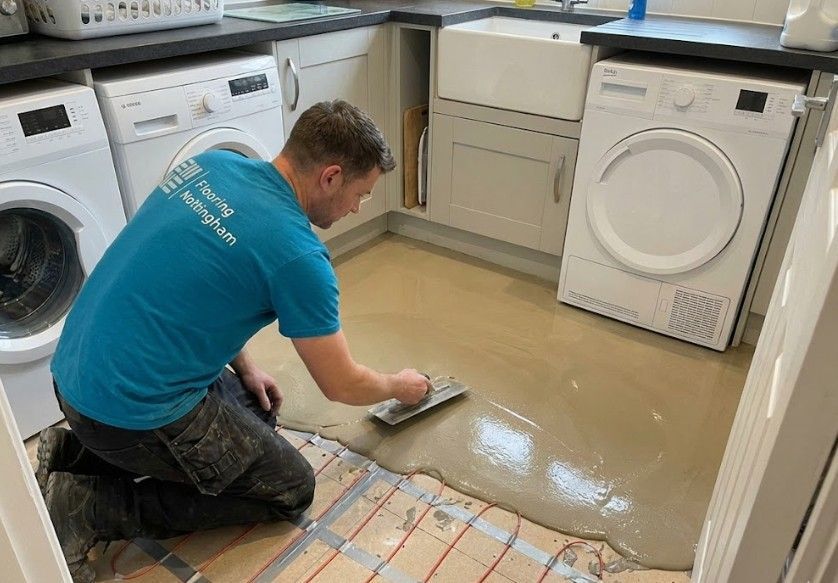
For liquid screed installations across larger areas, premixed screed arrives on site in a mixer truck. We pump it through wide-bore hoses directly to the working area, positioning the hose end methodically to ensure complete coverage. The flowing nature of liquid screed means it begins self-levelling immediately, but we don't simply leave it to its own devices.
Once the screed is poured, we work through it with dappling bars – specialist tools that agitate the material to release trapped air pockets and encourage even spreading. This agitation is crucial; without it, air voids can remain beneath the surface, creating weak spots that may later cause problems. For traditional sand-cement screed, our team uses screeding boards and laser levels to achieve the precise flat surface required.
Curing Time and Environmental Conditions
Screed curing times depend heavily on ambient conditions, screed type, and thickness. Temperature and humidity significantly influence the drying process. We avoid screeding work when temperatures drop below 5°C or exceed 25°C, as these extremes interfere with proper curing. Cold conditions slow the curing process excessively, whilst excessive heat causes the surface to dry too rapidly, potentially leading to surface cracking before the deeper layers have properly set.
Under typical conditions with temperatures around 20°C and moderate humidity, screeded floors become walkable within 48 hours of application. However, walkable doesn't mean ready for flooring installation. We recommend allowing at least 72 hours before commencing floor fitting work, particularly for tiled floors where tile adhesive requires a fully cured, stable substrate. For thicker screed depths or when working in cooler months, drying times extend accordingly, and we'll advise on realistic timescales during your consultation.
Professional Underfloor Heating Screed Installation
Flooring Nottingham provides specialist screed installation for underfloor heating systems throughout Nottingham, Beeston, West Bridgford, Long Eaton, Hucknall, and surrounding areas. Our comprehensive service covers the complete installation from insulation boards through to your finished floor covering, ensuring every element works together for maximum efficiency and performance.
As both screeding specialists and experienced flooring contractors, we eliminate the coordination issues that arise when multiple trades work independently on your project. One team, one guarantee, complete peace of mind.
Contact us on 0115 647 7207 to discuss your underfloor heating screed requirements and arrange a free site assessment.